

Starting your own T-shirt business was almost impossible back then if you didn’t have a factory and lots of blank shirts. Today, however, it’s becoming easier, and one online platform makes that a lot easier: Amazon.
Selling T-shirts on Amazon is an easy task and a great way to start a business online. Amazon created a program called Merch by Amazon, which allows anyone to sell print-on-demand Amazon Merch T-shirts on their platform. This platform lets you upload your design and start your online store anytime.
But before you get started, ensure you know how to use Amazon Seller Central since you still have to create an account to run your custom printing T-shirt business. Get more information firsthand.
What You Should Know about Merch by Amazon?
Before we get into the details on how you can start selling T-shirts online, let’s first know what Merch by Amazon is.
It’s a POD (print-on-demand) platform that lets you sell T-shirts by uploading your design. It not only covers simple T-shirts, but it also includes other upper wear such as hoodies, sweaters, and long-sleeve tops. The program was launched in 2015 with the original intent of helping out application developers sell their apps.
How it works
- Once you have created your account, you can start uploading your designs to the platform.
- After that, simply choose which merchandise you want to sell.
- After uploading your design to your chosen product, simply select the color that will complement your design.
- Set a price and give it a title as well.
- Publish.
After that, your product will then become searchable on the Amazon website. If one of them gets sold, you’ll receive a royalty in the form of money.
At first, the platform was available to everyone. However, as more people sign up, Amazon has to limit registration. So today, you can only get inside the platform if you receive an invite. Keep in mind, however, that it may take a few days or even weeks for your application to get approved.
If you get inside the program, you’ll be offered several “slots” to upload your designs. However, once you have filled in all of them, you will no longer be able to upload more until the products with your designs get sold.
You can think of this as the “first tier.” After you pass it, you’ll proceed to the next tier, where you can have more design slots. As you progress even further, you’ll have even more slots. Also, you’ll enjoy an increased daily upload limit for each of the tiers. If this sounds interesting, you should sign up for the program and ask for an invite now!
How to Get Started?
Signing up for the Amazon shirt printing program will only take 10 minutes or less. Here are the steps you should follow:
Step 1. Prepare your business contact information, bank account numbers, and social security or tax identification numbers.
Step 2. Request an invitation. You can do this by going to Merch by Amazon.

Step 3. Click Sign Up and log in to your Amazon account. It can be an existing buyer or seller account. You can also create a new one made specifically for the program.
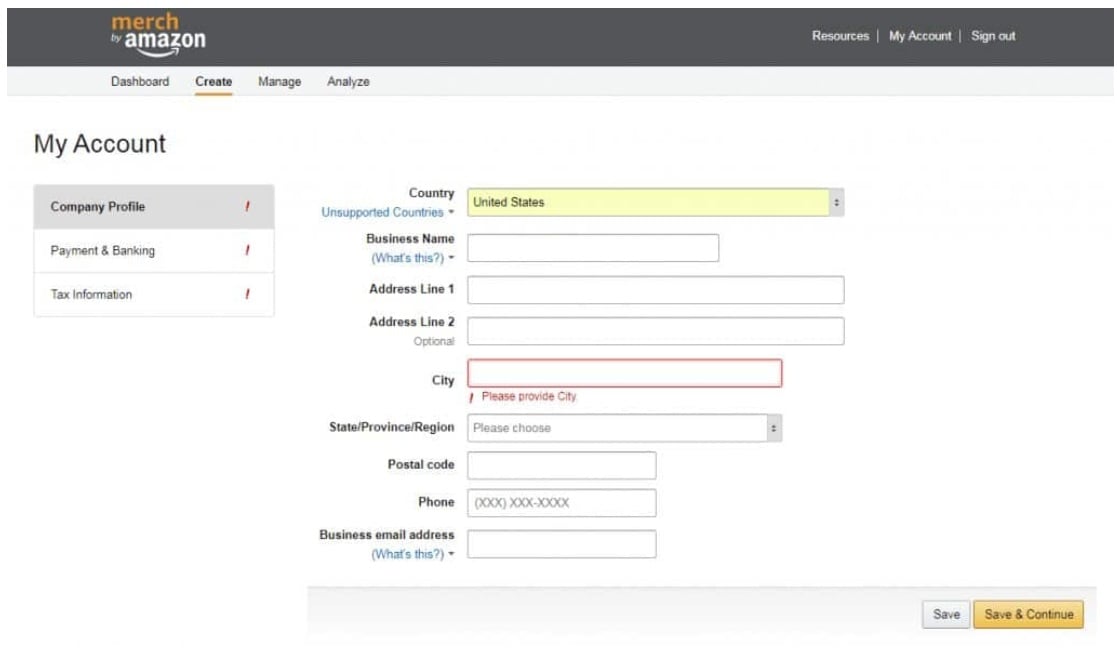
Step 4. Fill out the application form. Make sure you fill in the following fields:
- In the Company Profile tab, you can use your real name as the business name.
- For the Tax Information, if you are not based in the US, the company may withhold a percentage of your profits as withholding tax. If you are based in a country with a tax treaty with the United States, it is possible to lower the withholding tax. For this, you’ll have to contact the IRS to proceed.
Step 5. Finish the Request Invitation form.
For Industry Type, if you have previously answered with your name, it is recommended to pick “novelty T-shirt business.” If you have answered with a company name, choose “small business.”
- For Organization Name, enter what you have previously put in the business name. It is either you put your name or your company name.
- For Additional Information, this is the most crucial part of the application that will give you a higher chance of getting into the program. Try to be honest and transparent as possible. If you do not have previous experience in the print-on-demand industry, tell them. It is also a good idea to explain why you are interested in joining the program and how to market your product to Amazon’s customers. If you have previous industry experience, cite your previous works, trademarks, and connections.
- For the website, link it to your website if you own one.
Step 6. After submitting your application, you can download templates for the program and create new designs.
Just be honest as much as possible if you want to improve your chances of getting approval. You may also want to prepare around 5-10 designs and links to your previous works. If you don’t have experience with design, you can try to outsource it. Some best examples include Spreadshirt, Teespring, Zazzle, Redbubble, and more.
Keep in mind, however, that NONE of them are required to get approved for the program. So instead, they’ll just give you a head start and increase your chances.
After submitting your application, you may download the template for Merch from Amazon. This way, you can start uploading your designs right after you get accepted into the program.
The Merch by Amazon dashboard can be a bit confusing if it’s your first time. Once you have access to your account, Amazon will give you 10 slots to fill up with your designs. The tier structure has a starting base of 10 slots, and once you have made 10 sales and filled up most of your given slots, you will level up to the next tier. As you level up in the tier system, you’ll get more freedom to upload even more designs. The tier system is as follows:
- Tier 1 – 10 designs
- Tier 2 – 25 designs
- Tier 3 – 100 designs
- Tier 4 – 500 designs
- Tier 5 – 1000 designs
- Tier 6 – 2000 designs
- Tier 7 – 4000 designs
- Tier 8 – 8000 designs
There are cases when people jump to a higher tier. This happens when they made more sales than expected. For example, if you’re in tier 1 and you made 10 sells, you may jump to tier 10 immediately. However, such cases rarely happen, but they do happen.
The Merch by Amazon page has six tabs namely Dashboard, Create, Manage, Analyze, Resources, and My Account. Let us see how each tab works:
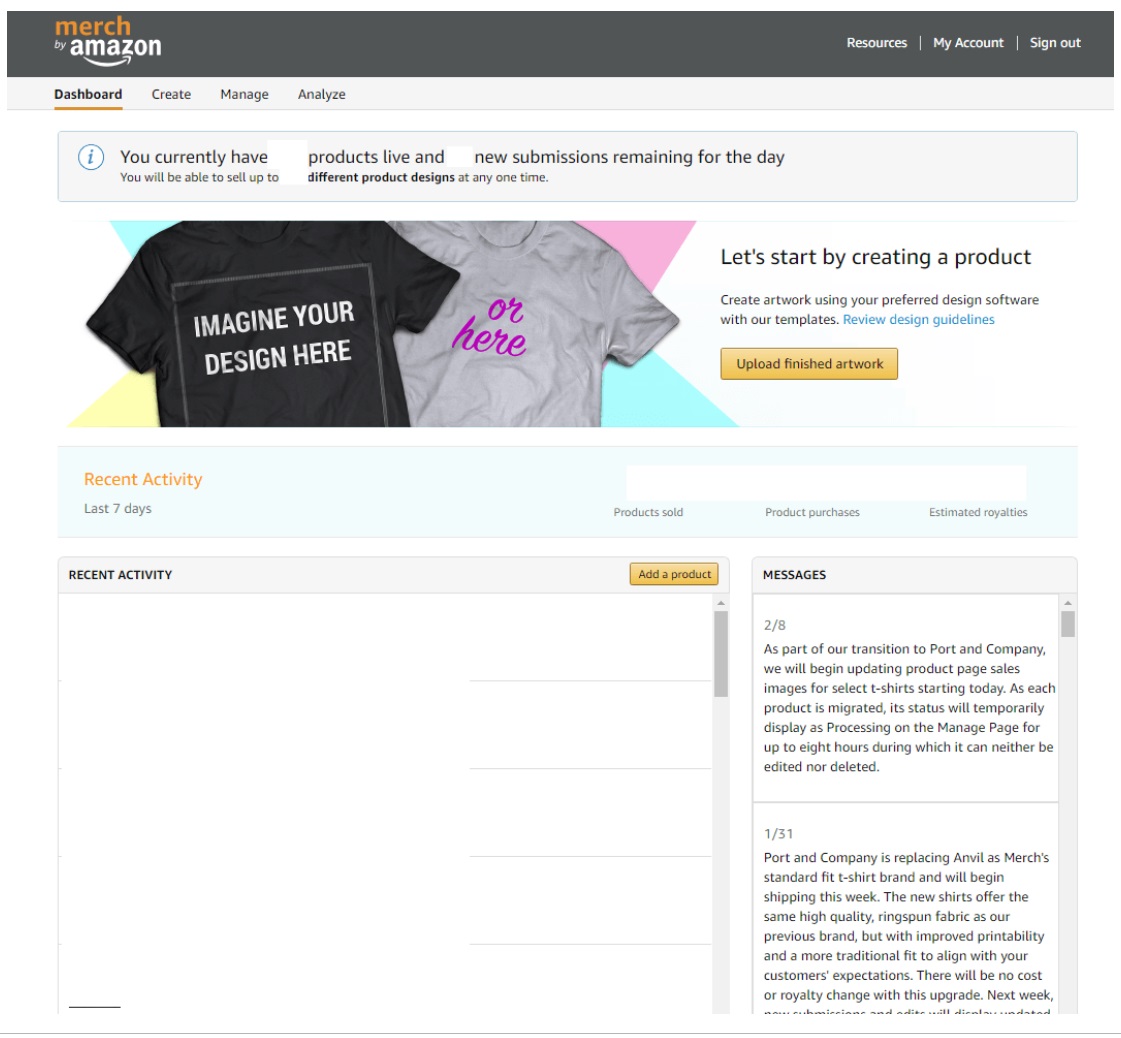
1. Dashboard
In the Dashboard tab, you can view all the products you have for sale. On the top portion of the page, you can view how many products are up, the number you can put up during the day, and the number of available slots. These can be seen under “recent activity,” located on the page’s left side.
Meanwhile, you can view messages from the Merch team and information about new product types on the right side of the page.
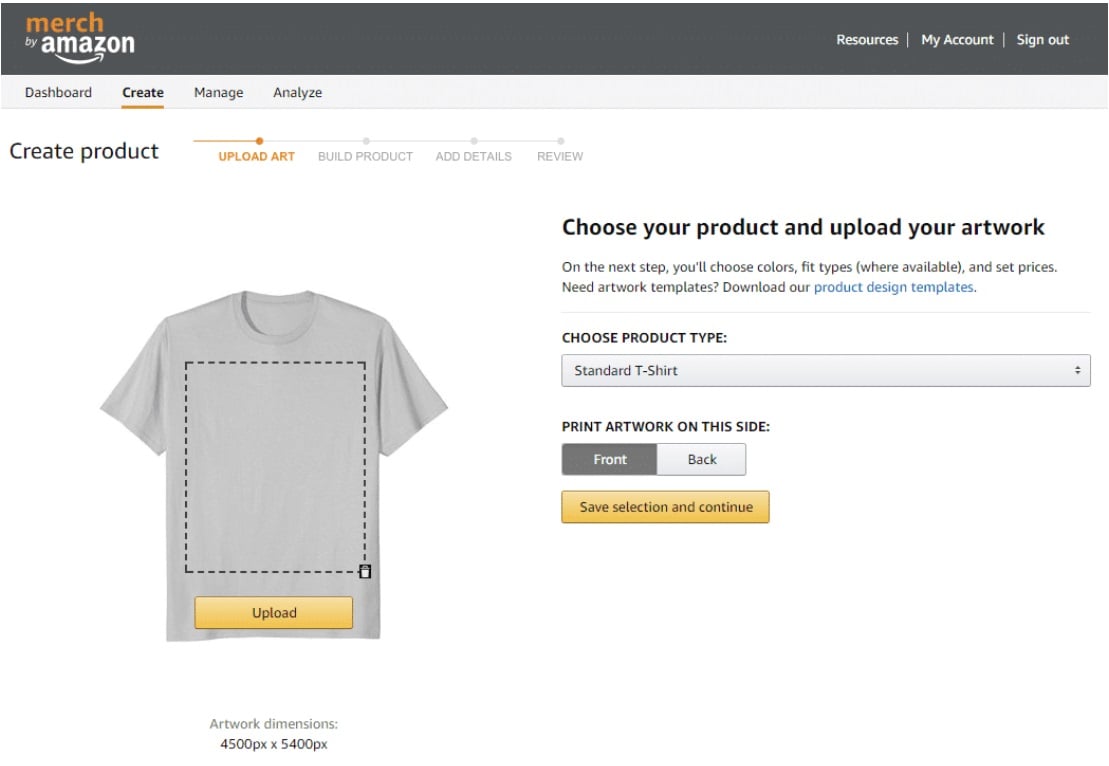
2. Create
It is where you upload new designs. You can see how your design will look on various product types on this page. You can choose the product type by clicking on the drop-down menu. It will also show you a mock-up so you can simulate your design on it.
3. Manage
The Manage tab helps you track all your products, including the uploaded designs. It includes information such as when you uploaded the design, how much you set your price, the product status, and an option as to whether you want to edit or delete a product.
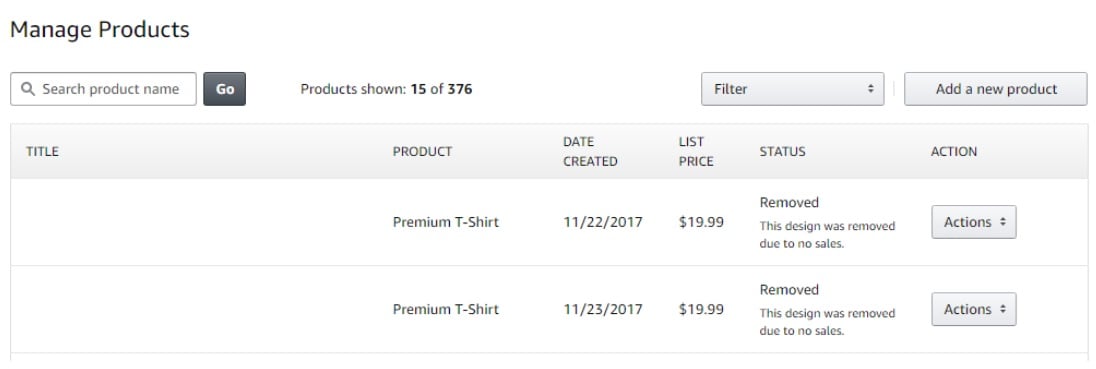
If your design is not purchased in 90 days, Amazon will remove it to maintain its catalog clean. If you can sell T-shirt designs, Amazon will sell them forever.
Upon uploading your first T-shirt, it will be labeled as “Under Review.” Once the system has reviewed your submission, it will proceed to “Started Processing” and “Processing” afterward. This only means that your submission has passed and is now live in the Amazon marketplace and ready for purchase.
You’ll notice a Live status once it’s already available. You can then click on the link to take you to your T-shirt listing, which your customers will see.
4. Analyze
In this tab, you can see what products were sold and when. You can also see what kind of royalty and earnings you have. These are located in the Earnings tab just below the Analyze tab. Amazon gives out payments the month after you received your earnings.
I would recommend checking the Earnings tab at least once a day to check if you’ve sold anything.
5. Resources
In this tab, you can view the content policy, the Frequently Asked Questions, and some documents to read. These are important information to read as they can ensure the success of your t-shirt business.
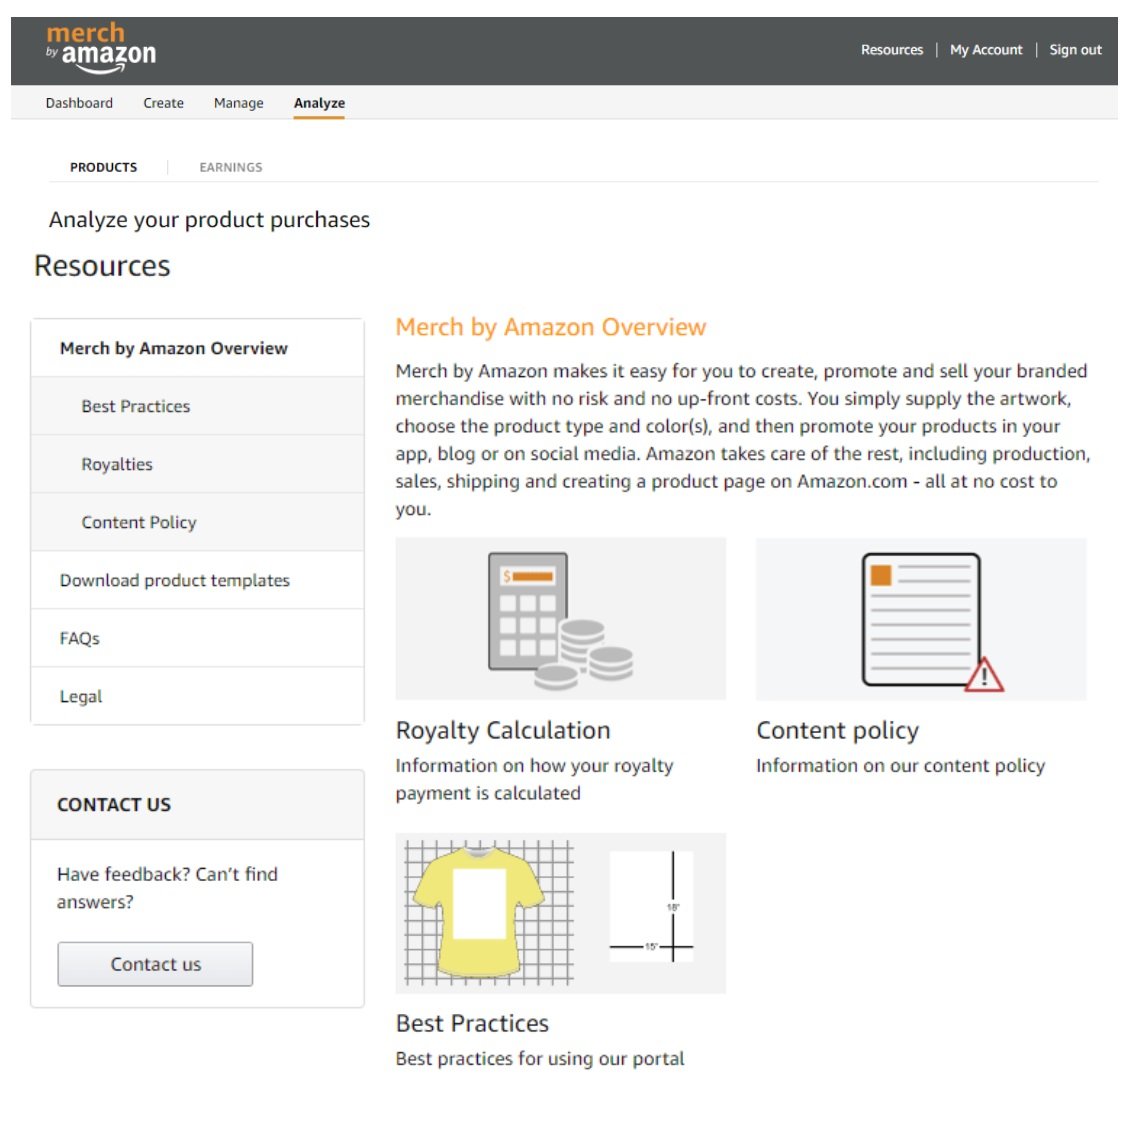
Although it can get somehow boring, all of the information in here is important. You can view the content policy here.
6. My Account
This is where you can see all the information you signed up with. You can edit some of your information if changes are needed. For example, you can update your business email address if you want, although you’ll have to grab your tax documents after that.
These are what comprise the dashboard. After getting familiar with all of them, you’ll find it a lot easier to use.
Copyrights and Trademarks
When you enter the program, you need to learn the two most important aspects: the Copyright/Trademark and Amazon BSR (Best Sellers Rank).
Copyrights protect artistic works and materials, while trademarks protect names, logos, and branding. These will protect you from others plagiarizing your works and, at the same time, protect others from you copying their designs. If you are found to be copying others’ work, you will be removed from the site. You have to think thoroughly about how to start a T-shirt company and research to avoid conflict for your branding when creating T-shirt company names.
Also, when you upload your designs on the program or any POD site, you should NEVER use the designs created by other people. It is considered a copyright infringement and will prompt these platforms to ban you. So, as much as possible, you should never practice doing this on Amazon.
However, copyright shouldn’t be an issue as long as you don’t copy other people’s work or use theirs. On the other hand, Trademark is something you might have to think about carefully. For example, trademarks such as “Aged to Perfection” can’t be used since it’s protected. So you should be careful when doing so.
You can use Trademarkia or USPTO to run the variations and texts of your design to protect yourself from any trademark issues.
Amazon Best Sellers Rank (BSR)
Amazon’s BSR is a metric used to measure how well each of their product is selling. It’s shown by using a number on each product about the sales it has received in a specific category.
However, this number is variable since it will depend on the number of products sold under the same category. Since listings made via Merch by Amazon are within the Clothing category, you’ll be able to find out how BSR will equate to sales once you start earning.
To search for a product’s BSR, go to its listing and check its product description. After that, look for the Amazon Best Sellers Rank section. It will give you information on that product’s BSR and category.
To give you an idea of how many units a product can sell daily, a BSR of 100,000 in the Clothing category equates to around 1-2 units sold daily. The lower a product’s BSR, the more units it can sell daily. Therefore, if your T-shirt has a BSR of around 40,000, it can sell around 5-8 units per day.
Also, a #1 Merch by Amazon product in the Clothing category can make around 5,000 to 10,000 sales every day. With a royalty of around $4-$7 per sale, you can see how they earn money and how much.
How to Get Your T-Shirts Noticed on Amazon?
Amazon is a massive playing field. That is why you should take a strategic approach to be noticed by AMZ shoppers. Here are the key things you should do to grow your discoverability for T-shirt printing on Amazon.
Carry out some Amazon SEO
Let’s imagine for a second you are an Amazon shopper who would like to purchase a T-shirt that represents your love for reading. You go to the website, enter “book t-shirt” in the search bar, and search. You can now see thousands of bookworm tees.
Sure, you will most likely compare some top search results. But you will not go through ALL the product pages. Therefore, sellers on the platform should have their pages appear high in the AMZ results.
That’s where search engine optimization comes in handy. It involves different strategies that increase your discoverability on the platform by nudging your page higher up in the search results.
Add winning product pictures
Improve your client’s purchasing experience by adding high-quality product images. As a result, it will be easier for them to discover what they require and be happy with the purchase.
To catch the eye of your AMZ customers, ensure your photos of Amazon picture printing are:
- Top-quality (well-lit, clear, not pixelated)
- Compliant with the platform’s rules (no additional text, white backgrounds, no illustrations or drawings)
- Showcasing your product in all the glory (extra lifestyle images, for example)
Promote your product listings
Registering your seller profile gives you access to AMZ Seller Central—a dashboard for Amazon sellers. Within the interface, there are three instruments you can use to boost your posts: Sponsored Display, Sponsored Brands, and Sponsored Products.
Social media is one of the most effective ways to boost awareness of your items. Remember: you will need to give each social platform particular attention. Visitors have different expectations for different social media platforms and what content they wish to see where. So entering the same content on every website will not be effective.
Also, check in with your profiles daily and see if clients are coming to you with their reviews, questions, and other messages.
Why Should You Care About Customer Reviews?
Positive reviews act as social proof for your products. When potential customers see positive feedback from previous buyers, it builds trust and confidence in the quality and value of your products. Positive feedback can influence purchasing decisions and encourage more people to buy your T-shirts.https://youtu.be/wN88XsskXUg?si=fHjNZJy1Ho1ljfeP
Moreover, reviews provide valuable feedback on your goods. Customers may mention what they liked about the design, fabric quality, sizing, or any unique features. This feedback helps you understand customer preferences, identify areas for improvement, and refine your products accordingly. Addressing any concerns or suggestions mentioned in reviews can enhance customer satisfaction and attract more buyers.
To leverage Amazon reviews effectively, you can encourage customers to leave feedback by providing excellent customer service, including a personalized note in the packaging requesting a review, or utilizing email follow-ups. With SageMailer, you can do it on autopilot.
Sellers can automate follow-up emails using Sagemailer to remind customers to leave a review after a certain period of time since their purchase. These gentle reminders can be helpful in prompting customers who may have overlooked leaving a review initially.
In addition, the tool allows you to schedule and sequence email campaigns strategically. By sending review requests at appropriate times, such as after customers have had sufficient time to use and evaluate the T-shirts, you can increase the likelihood of receiving valuable and timely reviews.
Amazon Merch Research
Handling your Amazon t-shirt printing business can be a handful, so it helps to do some merch research. Keep in mind that you need to cater to what your customers want. A good tip is to view the best selling t-shirts to get an idea which Amazon shirt printing company is selling a lot and what products they offer. Your goal is to make your products stand out and make them sell.
In conclusion, venturing into this type of business might have its challenging moments. However, it can be worthwhile if you get the hang of it. Hopefully, this informational guide will help you out with your Amazon shirt printing business.
Creating your own t-shirt designs is great but it’s only half the battle. Now you should get customers and sales, and product reviews is the thing you need the most in this case. SageMailer, in its turn, will help you with this, moreover, you’ll need to spend just 5 mins as everything is automated. Try this on your own with free 30-day trial!

This article is spot on! Starting a T-shirt business on Amazon? This is a must-read for any entrepreneur aiming to scale and succeed. Kudos to the author for sharing such valuable insights!
Jon Morgan