


Table of Contents
 You’ve got to be proactive. If you want to be successful, you can’t sit back and wait for customers to come to you – reach out to them.
So where are they? Facebook.
Facebook is the largest social network in the world, with more than 1.70 billion people logging on daily to spend an average of 58.5 minutes on the platform.
That’s insane.
If you sell products online and you don’t have a Facebook shop, you’re missing a huge opportunity.
Every merchant searches for a broader range of ideas to expand their business and looks for a trusted marketplace to grow their connections with their customers. So, here’s a complete guide for online sellers explaining how to sell on Facebook Shop by creating a dedicated business page and steps to create a Facebook shop.
What Is Facebook Storefront?
A Facebook Shop is an online store that lives on Facebook and Instagram and allows users to browse, shop, and make purchases either directly on Facebook or by clicking through to a company’s website to complete the sale.
Facebook and Instagram users can find businesses on Facebook Shop via a Facebook page or an Instagram profile.
What’s cool about Facebook Shops is that the feature is discoverable organically or through ads, meaning there are lots of opportunities for social media marketers to optimize businesses for both channels.
Facebook and Instagram Shops are for businesses or content creators with a Facebook business page and/or a Professional Instagram account. If you don’t have either for your business or brand, you can easily create a new Instagram account and Facebook business page.
To create a business page on Facebook, you must have an active Facebook account.
Facebook eCommerce Shop: Specific Features
Some special features of the Facebook shop include:
- Seamless connections across Facebook Commerce Surfaces: Surface your products across Facebook networks, i.e., Facebook groups, Facebook Shops, Page Shop, and Instagram Shopping offering checkout services to the customers.
- Native mobile experience: Facebook Shop provides a full-screen immersive experience and showcases your collections as personalized products. Thus, providing an effortless shopping experience to your potential buyers lets them purchase through mobile phones offering checkout.
- Seamless checkout experience: Now, sellers can enlist their products on Facebook shops and allow potential buyers to discover, explore, and buy the products right from within the platform.
- Personalized shopping experience: Now, your customers can connect to the product of their choice by tracking the user’s activity. Thus, providing a customized shopping experience to the customers by showcasing the relevant content based on their searches, clicks, etc.
- Better sales through conversions: Facebook Shops let customers quickly get in touch with you or your Facebook product marketing manager through Messenger, and Instagram Direct and will soon allow you to surface your business on WhatsApp where you can ask questions, get support, track deliveries, and more.
- Additional features: Drive more product discovery by promoting your products on Live feature, through Instagram stories, posts, etc. Now, businesses will tag products from their Shop or catalog before going live and help people make a purchase more seamlessly.
What Are the Benefits of Setting Up a Facebook Shop?
Before we look at how to create a Facebook shop, it’s important to understand exactly how a Facebook store can help you grow your eCommerce business.
Here are the three main benefits of having a Facebook store, traditional or mobile-first:
You can tag your products in Facebook posts to boost sales
Once you have a Facebook shop set up, you’ll be able to start tagging any of the products featured in your images. This ensures that everyone who views your posts will become aware of the products you have available. Here’s the best part: Once you’ve set up your Facebook shop, tagging products in posts is quick and easy. More on that in a minute.
People hang out on Facebook. Remember, the average daily user spends nearly an hour on the platform every day. By using Facebook Shops or adding a Facebook Shop tab to your page, you can capitalize on the way users engage on Facebook.
Unlike your website, when people view your products on your Facebook store, they can Like them, save them for later, share them with friends, or leave a comment asking a question or sharing their thoughts.
Also, if you’re in the U.S. and have checkout enabled, customers can place an order without having to leave the platform.
Each of these actions will help to expose your brand to new people in the best possible ways– through a friend. These engagements work as a powerful form of social proof – meaning that people are heavily influenced by the opinions and actions of others.
A Facebook sales channel can help reduce friction in the sales process
You want to make it as easy as possible for people to purchase your products. The more hoops you make customers jump through, the more likely they’ll give up or get distracted and not complete their purchase.
Simply put, a Facebook store makes life easier for Facebook users.
They can browse your products in the same window they’re using to chat with friends. Plus, they can add products to their cart and then check out on the platform, or head to your website to finish purchasing your products.
What Are the Facebook Shops Fees?
What? You expected Meta to let you run a shop on their platform for free? Facebook’s gotta make their money somehow, and Facebook Shop fees give Meta a small cut of your sales. Luckily, the selling fees aren’t extortionate. Let’s break ‘em down:
- Whenever you make a sale on Facebook Shops, Meta will take 5% per shipment
- If your shipment is under $8, Meta will take a flat fee of $0.40
- The selling fee includes taxes, and the cost of payment processing, and applies to all checkout transitions for all products on Facebook Shops and Instagram
How to Set up a Facebook Shop?
In this section, we’ll work through how to set up and manage a Facebook store using only the platform itself.
Again, if you don’t yet have one, make sure to set up a Facebook business page before continuing.
Okay, let’s jump in.
Step 1: Add the “Shop” tab
Navigate to your Facebook page and click “Settings.”
You’ll then be presented with a huge menu of Facebook page options. Now, click “Templates and tabs” so that we can add the Facebook shop tab.
This will show you all of the tabs you’re currently using. Scroll to the bottom of the list and click “Add a Tab.”
Now, find “Shop” and click “Add Tab.”
Add Facebook ShopThis will add the shop tab to your Facebook page.
If you’d like to rearrange the order of your tabs, just click the three horizontal lines and drag your tabs into your preferred arrangement.
However, when doing this, make sure that your shop tab is in the top three. This will ensure that it’s still visible when your tab list is shortened by the “See more” link.
Step 2: Configure your Facebook shop tab
If your shop tab isn’t displaying correctly, head back to “Templates and tabs,” click on “Settings,” and make sure the “Show Shop tab” is on.
Once you’ve done this, head back to your Facebook page and click on “Shop.”
To continue, you must agree to Facebook’s Seller’s Terms and Policies. Make sure to read these through before agreeing and clicking “Continue.”
Next, Facebook will ask you how you’d like people to purchase products from your shop.
Anywhere outside of the U.S. has two options: “Message to buy,” or “Checkout on another website.”
If you live in the U.S. you’ll also be given the option to accept payments directly from your Facebook page by linking your bank or Stripe account. (Click here to learn how to do this.)
Once you’ve chosen your payment method, it’s time to add products to your Facebook shop!
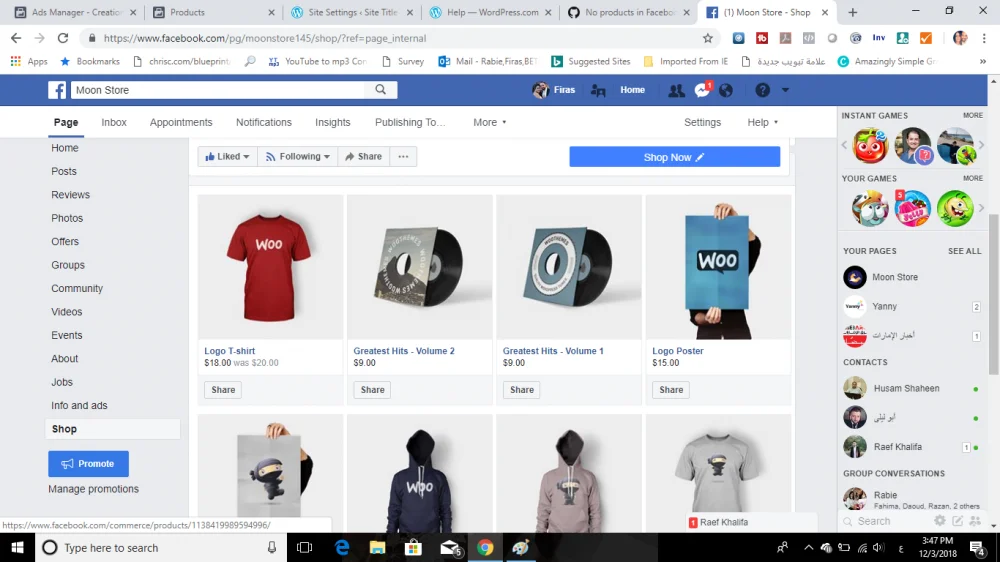
Step 3: Add products to your Facebook shop
To start, head to your Facebook shop tab and click “Add Product.”
Add Product to Facebook Shop
Next, upload your product photos and videos. Then, type in your product name, price, and include a compelling product description.
Now, Facebook has detailed guidelines and recommendations for product listings. Let’s take a quick look at some of the most important points.
You must:
- Include at least one image for each product listing
- The image must be of the product itself (it can’t be a graphical representation)
Ideally, you should use images that:
- Show all of the product
- Show the product up close in a well-lit setting
- Have a resolution of 1024 x 1024 or higher
- Are in the square format
- Have a white background
- Showcase the product in real-life situations
Don’t use images that contain:
- Text (e.g., calls-to-action or promo codes)
- Offensive content (e.g., nudity, explicit language, violence)
- Advertising or promotional material
- Watermarks
- Time-sensitive information (e.g., limited time offers)
Your descriptions shouldn’t include:
- HTML (Rich text only)
- Phone numbers or email addresses
- Long titles
- Excessive punctuation
- All the letters are capitalized or in lower case
- Book or film spoilers
Ideally, your descriptions should:
- Only provide information directly related to the product
- Be concise and easy to read
- Highlight unique product features and benefits
- Be grammatically correct and properly punctuated
When you finish, make sure to click the toggle to enable sharing and then click “Save.”
At this point, you’ll need to wait for Facebook to review and accept your products. This usually takes a few minutes and Facebook will notify you when processing is complete and your products are visible.
Step 4: Manage your products and orders
To manage your products and orders, click the “Publishing Tools” tab at the top of your Facebook page, and click “Shop” near the bottom of the sidebar menu.
If you’re based in the U.S. and opted to allow users to checkout on Facebook, you’ll get a notification each time you receive a new order
You also have an additional tab under the “Shop” menu to manage your orders.
Do you have a Facebook store? Let us know about your experiences in the comments below!
