


If you haven’t tried listing items on Amazon just yet, this guide is for you. It is created to provide you with quick and easy step-by-step instructions on the Amazon listing process. Regardless of what products you offer, this guide will attempt to cover everything you need to know about the basics of product listing on Amazon and how to create a listing on Amazon.
Important! Make sure you understand how the Amazon Seller Central dashboard works and how to use it so that you will have no trouble with creating your first product listing.
After reading this article, you can learn how to list items on Amazon easily. For example, we’ll be using wireless headphones as our product. However, keep in mind that this isn’t a true product, so we won’t be going through the shipping process.
Before that, let’s first know what is an Amazon listing. Basically, an Amazon listing of products is where you showcase your product for customers to see and potentially buy. By submitting an Amazon listing, you’re including your product in the Amazon marketplace.
How to List Products on Amazon
Step 1: Sign in to Amazon Seller Central
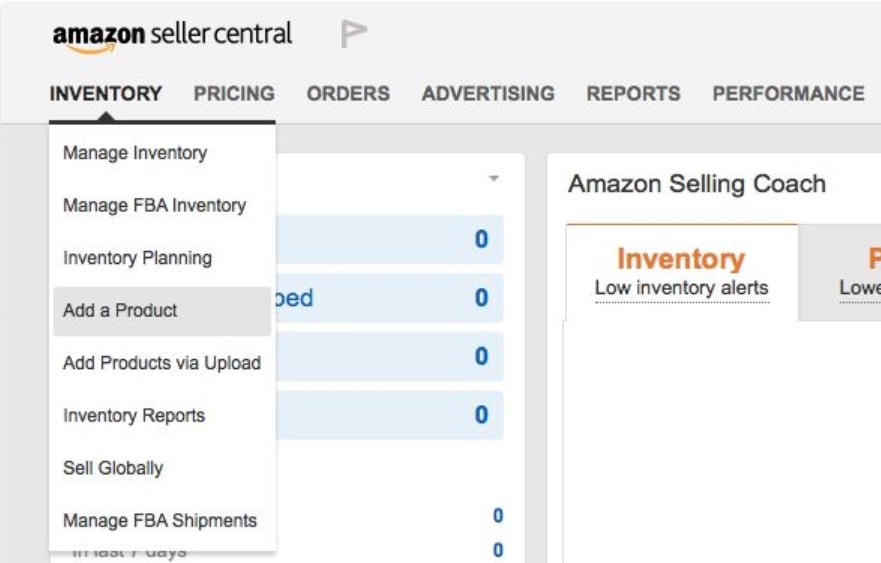
How to list something on Amazon? First, sign in to your Seller Central account to see how to add a new product to the Amazon Seller profile.
Go to sellercentral.amazon.com and choose “Log in” Fill in your email and password. You will get an OTP code on your registered mobile number. Enter this code to log in.
Look for the “Add a product” option in the inventory drop-down menu and click on it. Alternatively, you can upload several products by clicking “Add Products via Upload.” However, the latter is only suitable if you plan to list different products. If this is your first listing, you might want to ignore this as it contains many spreadsheets that might be overwhelming.
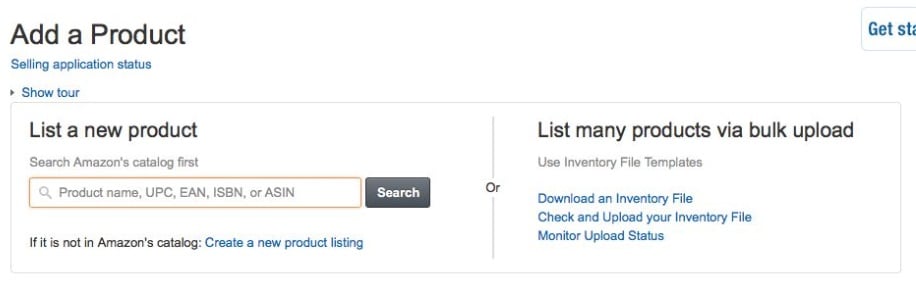
Step 2: Add your products
The system will then direct you to the “Add a Product” page. Here sellers choose to select an existing product or make their own. You can find three options to pick from:
- The first option shows you how to add a product to Amazon that’s already existing on Amazon. You will need to search for the product using its name or product ID.
- The second option is to create a new product listing on Amazon. Right below the search box, you will find the “Create a new product listing” option. This is suitable for those who want to know how to put products on Amazon which have never been sold before.
- The third option allows you to upload multiple products simultaneously. To do so, simply click on “bulk upload” on the right side of your screen.
For this guide, we’ll use the second option as it’s the most suitable option for most beginners.
Step 3: Come up with product categories
After clicking on “Create a new product listing,” the system will ask you to categorize your new item using any Amazon product categories. Two methods will help you identify your product’s category: you can either use the search bar or browse through the categories. Using the search bar is far more comfortable. That is how you create an Amazon listing. Next, select your product categories and subcategories to classify your goods.
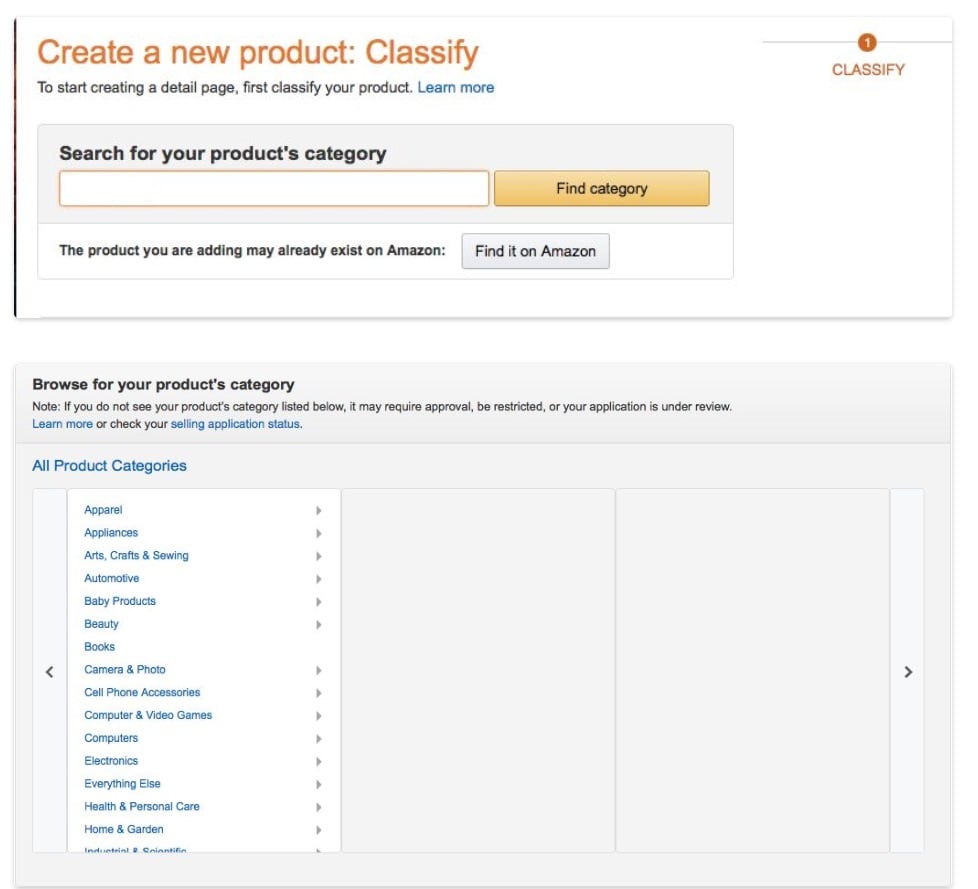
Step 4: Categorize your items
Type your product in the search bar for the possible categories of your product to come up. Choose the most appropriate category for your product.
Pro Tip: Analyze your competitors. Look at what category they have chosen for similar product listings and follow their lead.
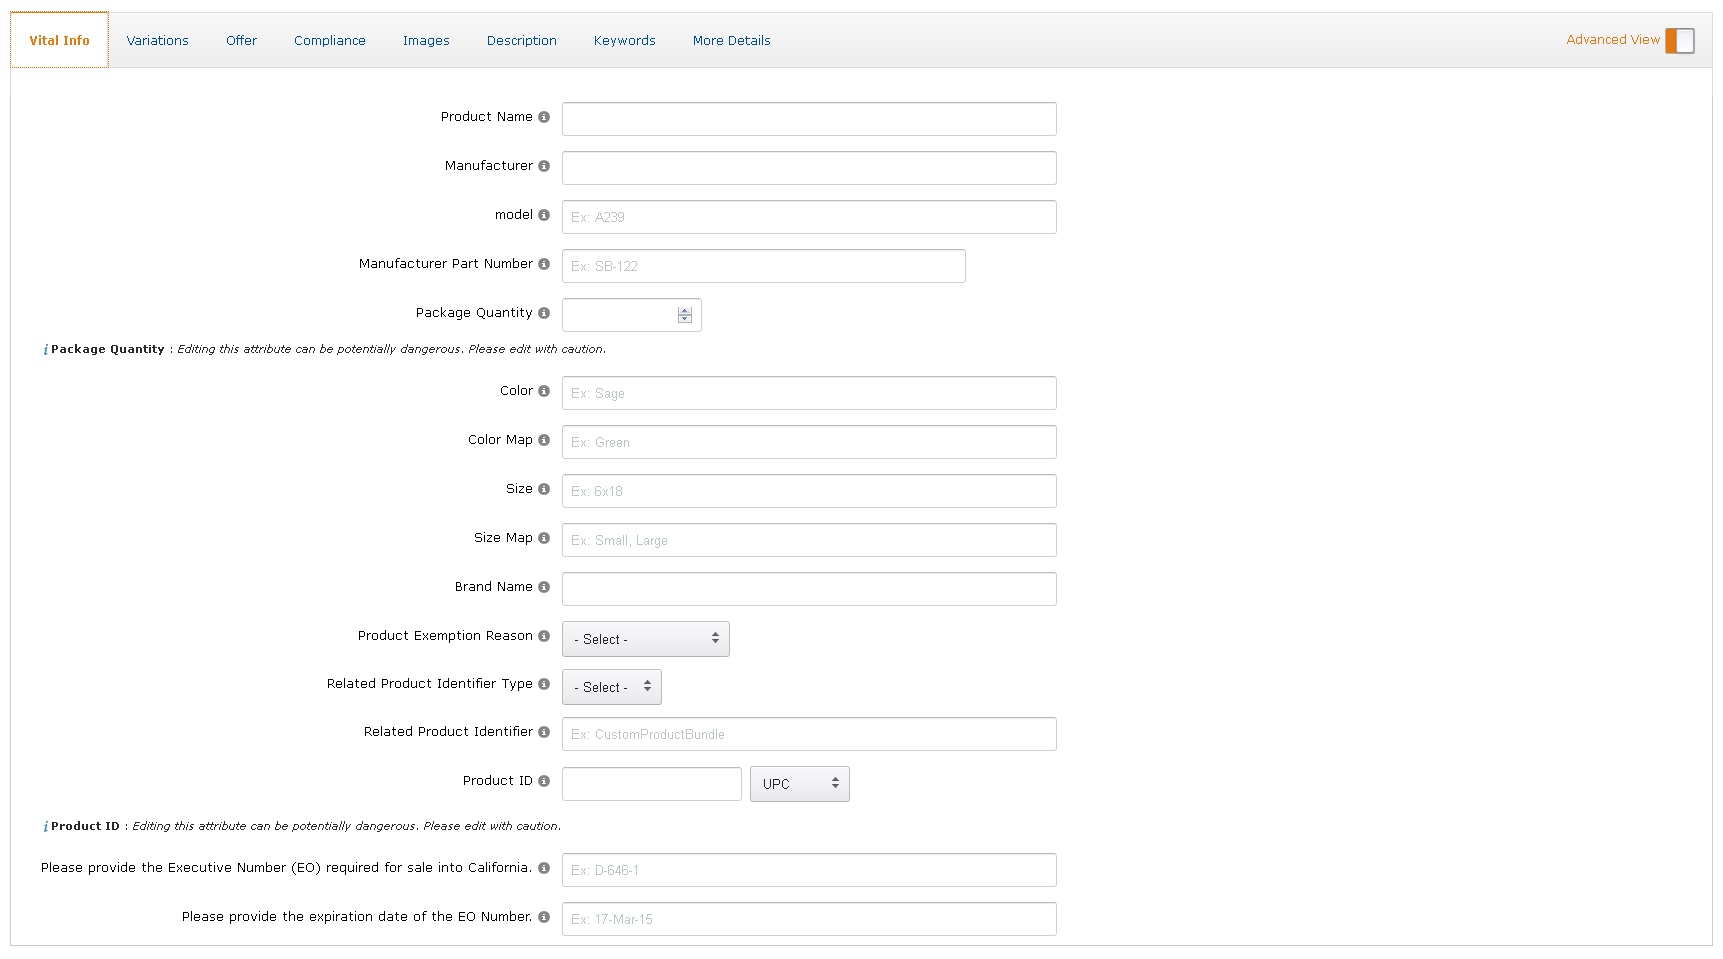
Step 5: Fill in the product information
Add the necessary information regarding your new product in the Listing Info. Move to the next page where you’ll notice the listing information divided into 7 different tabs which include the following:
- Description
- Images
- Keywords
- Offer
- Variations
- Vital Info
- More Details
In the Vital Info tab, fill in your UPC, the product title (item_name), manufacturer name, and brand name. The manufacturer and brand names must be the same. Try to keep your product title nearly 160 characters for higher conversion. Remember to include the main keyword.
Let’s talk about each of them.
1st Tab: Vital Info
The Vital Info tab is more on the information about your product as a whole. It includes the details that your customers can see upfront. It includes the following fields:
- Product Name. Make sure it includes as many keywords and product characteristics as possible.
- Manufacturer and Brand name. If you are a seller of your own brand, then in the Manufacturer and Brand name boxes, you write your company’s name.
- Manufacturer Part Number. The filling is only required if your product is a replacement part of another.
- Package Quantity
- Material Type. By clicking on the field, you can select a material from the drop-down list.
- Color and Color Map
- Shape. Leave this field blank if it is not relevant to your product.
- Lens Color
- Size
- Hand Orientation
- Tension Supported
- Global Trade Item Number Exemption Reason
- Related Product ID Type. If there is a link between your product and another, then you enter the ID of the other here.
- Related Product ID
- Item Display Dimensions
- Item Display Weight
- Weight Supported
- Display Maximum Weight Recommendation
- Shaft length
- Product ID
2nd Tab: Variations
This tab is only applicable if the product you offer is available in various colors, sizes, shapes, or designs. You can open the drop-down menu to pick which variation suits your product, if any.
3rd Tab: Offer
The Offer tab contains a number of options which can be optional depending on your products and preferences. Essentially, it contains the following fields:
- Import Designation
- Country of Publication
- Seller Warranty Description
- Release Date
- Country as Labeled
- Is Gift Wrap Available and Offering Can Be Gift Messaged
- Tax Code
- Fulfillment Latency
- Restock Date
- Legal Disclaimer
- Start selling date
- Signed By
- Fulfillment Channel

In this section, you can either fulfill your product orders or use Fulfillment by Amazon. I highly recommend choosing the latter.
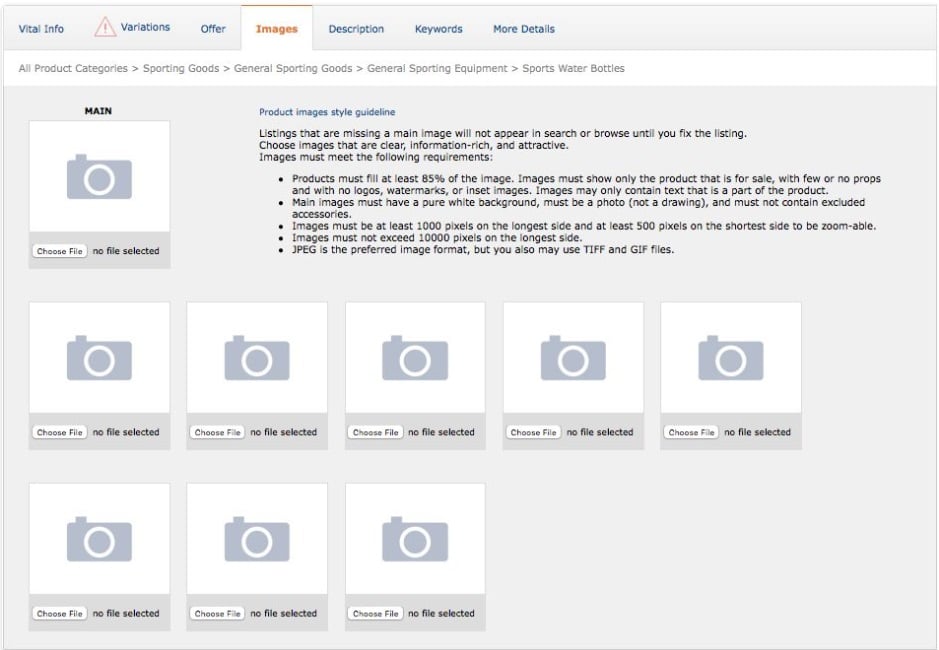
4th Tab: Images
The Images tab is where you have to upload your product images. Just make sure you follow the guidelines set by Amazon with regards to image requirements.
5th Tab: Description
The Description tab is made of two different sections: Product Description and Key Product Features. The Product Description gives you more room to market your product to your potential buyers. In this section, you can talk about the benefits your customer can get from your product. As it has a limit of 2,000 characters, you want to explain how your product can solve your customer’s concerns as clearly as possible.
The Key Product Features field, on the other, are the bullet points which are placed near your listing. According to a lot of expert sellers, Amazon uses the keywords in your bullet points as one of their factors for ranking products. Therefore, I highly recommend including your keywords in there as naturally as possible. Still, Amazon claims they don’t, but it won’t hurt if you follow what the experts say.
Also, while there’s a 100-character limit per field as what Amazon claims, you can go beyond that and the extra characters will still appear on your listing. They may eventually reinforce this, but as of now, it’s completely possible to exceed 100 characters.
6th Tab: Keywords
Keywords play a major role when you add a product Amazon. Even though the information you place can’t be seen by your customer, such information will be used each time a customer searches for your product using the search function.
There are several fields you’ll come across the Keywords tab. The most important among them is the Search Terms field. In this field, you want to fill every field with relevant keywords as much as possible, and don’t forget to separate each keyword using a comma. Just make sure not to repeat keywords as they’ll only take up valuable space. This also means that once you’ve entered a keyword in your title or bullet points, don’t use them again in this section.
This makes keyword research really important. You want to find as many relevant keywords as possible so you can add them in your bullet points, title, and the keywords field.
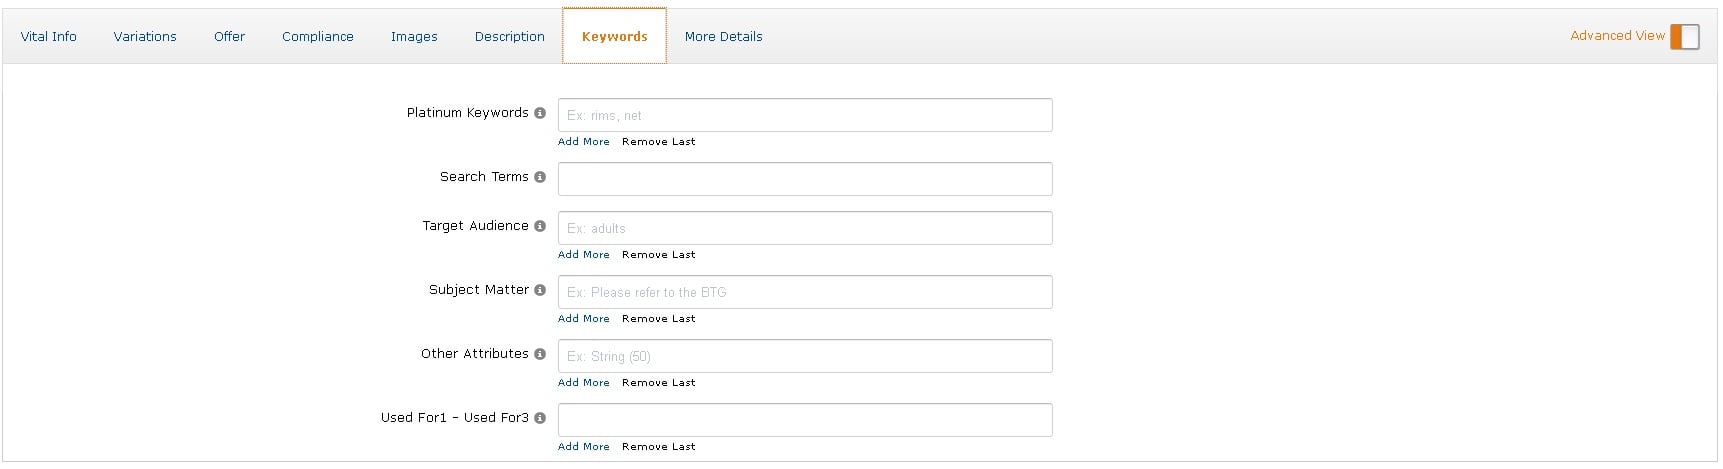
The other four sections are all fields with a drop-down menu. To proceed, simply click on each of them and choose the most appropriate option from the drop-down list. Although it’s tempting to skip this part since it takes more time than the rest, we highly advise against doing so since Amazon will be using every information in this section to index your products for customer searches.
7th Tab: More Details
This section is pretty self-explanatory. There is where you’ll come across a lot of fields and fill them in as many as you can. In some cases, you might come across fields that don’t have any connection to your certain product, although some of them might be important for Amazon.
Also, this tab is customized depending on your product category. Lastly, it’s the longest among them all. However, I should let you know that this is also where your product’s price is determined. There are two places where you can enter your price:
- Sale Price
This is basically where you enter the actual price a customer will have to pay to purchase the product on your listing. In the customer’s dashboard, they’ll see this on the Price section just below the List Price.
- Manufacturer’s Suggested Retail Price
This is where you can enter the price for your product if you want to sell it at an even higher price. It will show up as the List Price on your product listing.
That said, every field in this tab is customized and self-explanatory. In fact, most of them are optional, so if you have a few fields you don’t understand, just ignore them.
After entering all the information and uploading pictures, don’t forget to scroll down and click on the “Save and Finish” button to complete and save all the changes to your Amazon listing.
Congrats – you have now listed your item on Amazon.com!
Conclusion
After reading these Amazon listing guidelines, you now have a basic knowledge of how to list something on Amazon. Once you have followed all the step-by-step instructions and inputted all the important information, you should proceed to click “Save” and “Finish”.
In some cases, this might be greyed out. The only way you can proceed is to find which field or tab is missing vital information. Simply check the tabs, particularly look for ones that have a caution exclamation icon. From there, you’ll find a field highlighted in red. Simply enter the needed information and you should be good to go.
If you still come across a problem, contact Amazon support by using the Amazon seller Help function. You can find this in your Seller Central Dashboard and can be located at the top right corner of the page.
You should also take advantage of a service called Fulfillment by Amazon (FBA) which is ideal for new sellers on Amazon. The FBA is suitable for merchants seeking to increase shipping while reducing time and money expenses.
By FBA list, they will qualify for free shipping. They will also be eligible for Amazon Prime, a feature that enables customers to purchase more with a higher frequency compared to traditional Amazon shoppers.
All FBA listings during display have the Prime logo. Thus, customers are certain that Amazon handles the packing, delivery, returns, and customer service.
Now, when you’ve listed your first product on Amazon, it’s time to focus on getting product reviews. The most reliable and quick method is asking your own customers. And that’s where SageMailer comes in handy, this service helps to automate the whole process of asking for reviews in just 5 minutes.

Simple, straightforward and clear explanation! Thankx
Thank you so much for your generous info!
Thank you guys! You’ve saved me a ton of time reading through all the faqs in seller central!
I just listed my first product on Amazon with your help woo-hoo
Easy and clear, thank you!
So for every new product, I need a unique upc, right? And thank you for this
Yes, that’s right. For every new product that you add on Amazon, you need a unique and legit UPC. You can check GS1 for more details.
thank you a million times – I have spent 2 months to figure this out. You are the first who has explained it the best way. Much appreciated!
this saved me a ton of time reading through all the FAQ’s! Thx!