


Table of Contents
- 1 What are Amazon Seller Central User Permissions?
- 2 How to Give User Permissions on Amazon Seller Central?
- 3 How Do I Grant Access to Seller Central User Permissions?
- 4 What types of user permissions are available in Amazon Seller Central?
- 5 Add User to an Amazon Account – What’s Next?
- 6 Enhancing User Permissions Management with Sagemailer
Running an online business is always challenging. You always have to stay tuned to the trends and updates, suggest more and more competitive strategies, track and control your performance, inventory, and seller ranking, plus look for ways to deliver better products with better customer experience at low costs. Amidst these challenges, understanding amazon customer reviews can provide valuable insights into improving your products and services. All these tasks can be overwhelming, so sooner or later, you will face the need to have some rest and perhaps ask somebody to control your Amazon Seller Central account while you are on vacation.
If you aren’t ready to share your credentials, you can configure the permissions in such a way that the person you trust can get access to account tools and features. So, here is how to add someone to an Amazon account simply and finally have some well-deserved rest.
What are Amazon Seller Central User Permissions?
In Amazon Seller Central, user permissions refer to the level of access and control that can be granted to different users within a seller’s account. This feature allows sellers to provide limited access to specific individuals or teams while maintaining control over their account. By granting user permissions, sellers can delegate tasks and responsibilities, effectively managing their operations in a more collaborative manner.
How to Give User Permissions on Amazon Seller Central?
As you got it, Amazon user permissions are the opportunities you share with somebody else to let them manage your store. How do I give user permissions on the Amazon seller account? To do it, you just have to add another person to your AMZ account so that the new user can access all the essential features needed to run a store successfully. Amazon manages permissions in Seller Central in a pretty easy way. You can set up and adjust user permissions in just several clicks on the buttons. Here is how to give access to your AMZ profile:
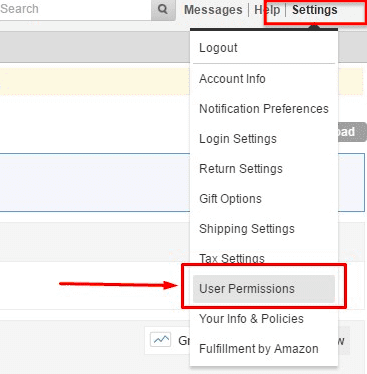
- To create Amazon Seller Central user permissions, log in to your account and switch to Settings.
- Choose the user permissions feature.
- Then, you will be redirected to the user permissions page, where you, as an account administrator, can view and edit preferences as well as invite users to help you with the AMZ store running.
- As the next step, type the name of a new account manager you would like to assign.
- Also, enter their email address and double-check you have typed it correctly.
- Choose the language – English is set up by default.
- Then, click Send an Invitation and complete the invitation process.
And that’s all. As a rule, a new person will instantly receive a confirmation code, and you will be able to see all the users you have allowed to help you with your AMZ store. You can also click User Permissions to see the list of the allowed users and manage the access levels for each user. You must do it for each user’s account if you want to add user permissions to multiple different Amazon accounts.
How Do I Grant Access to Seller Central User Permissions?
Granting access to Seller Central User Permissions on Amazon is a simple process that allows sellers to control and customize the level of access that each user has. To grant access, sellers must follow these steps:
- Log in to their Amazon Seller Central account.
- Go to the Settings tab and select User Permissions.
- Click on Add User or Invite a New User.
- Enter the email address of the person or team that requires access.
- Choose the appropriate permissions level for the user from the available options.
- Select the desired settings for Order and Report permissions, if applicable.
- Click on Send Invitation to invite the user.
Once the invitation is sent, the recipient will receive an email from Amazon with details on how to accept the invitation and set up their account. Sellers have the option to add multiple users with different permissions levels, depending on their specific needs.
What types of user permissions are available in Amazon Seller Central?
Amazon Seller Central offers various types of user permissions to cater to the diverse needs of sellers. These include:
- Administrative Permissions: This permission level provides users with full access to all features and functions within Seller Central. Administrators have control over financial information, inventory management, product listings, account settings, and more. However, it is essential to exercise caution when granting administrative access, as it can significantly impact the overall operation of the account.
- Permissions by Section: Amazon Seller Central allows sellers to grant access to specific sections of the account. This permission level enables users to access and manage specific areas, such as Inventory, Orders, Reports, Advertising, or Performance. Sellers can tailor user access to specific tasks or areas of expertise.
- Limited Access Permissions: With limited access permissions, users are granted restricted access to specific features and functions within Seller Central. This permission level is ideal for users who need to perform specific tasks without full access to sensitive information or critical account settings.
By offering these different levels of user permissions, Amazon aims to provide sellers with flexibility and control over their operations, allowing them to collaborate effectively with their teams while maintaining the security and integrity of their Seller Central accounts.
Add User to an Amazon Account – What’s Next?
After you have added a user to an Amazon business account and the user has accepted your invitation, you have to make sure your new managers are well aware of the best practices for AMZ store processes. Use the tips below to stay calm about your business while on vacation or just want to outsource some of your routine tasks to somebody you can trust.
- Explain to your new managers the way the Seller Central dashboard works. It may seem intuitive for experienced sellers who see it day after day but getting through all the features may challenge those new to business in the marketplace.
- Never give permission to those users you can’t trust. Your Seller Central account stores valuable information that can be profitably resold on the black market, so make sure your business will be safe.
- Pay special attention to your buyers, ensuring an excellent customer experience and gathering their feedback. Seller Central has an option to contact buyers and ask them for a review. Still, SageMailer has a broader set of features necessary to gather your users’ feedback and improve your products’ ratings.
You are welcome to give it a try right now for free, personally check how it works for your business, and then explain to your permitted users how to handle SageMailer.

P.S. It is easier than you might think – let’s check!
Enhancing User Permissions Management with Sagemailer
Sellers who are looking for additional tools to enhance their user permissions management experience in Amazon Seller Central can turn to SageMailer, an all-in-one email automation and analytics platform designed for Amazon sellers. SageMailer offers a range of features that can streamline communication, enhance collaboration, and improve efficiency within a seller’s account.
One of the standout features of SageMailer is its ability to automate the user invitation process. Instead of manually sending each invitation, Sagemailer can send bulk invitations to multiple users, dramatically reducing the time and effort required. Additionally, Sagemailer provides users with real-time updates on the status of each invitation, ensuring that all users have accepted and set up their accounts.
Sagemailer also offers detailed analytics and reports on email performance, allowing sellers to monitor and evaluate communication effectiveness. With this information, sellers can optimize their user permissions management strategy, ensuring that all team members receive necessary information and updates.
Furthermore, Sagemailer’s user-friendly interface makes it simple and intuitive to manage user permissions. Sellers can easily navigate through the platform and grant or revoke permissions as needed, ensuring that access is always up-to-date and aligned with business requirements.
Incorporating a tool like SageMailer into user permissions management in Amazon Seller Central can provide sellers with valuable benefits. By streamlining the invitation process, providing analytics for monitoring communication, and simplifying management tasks, Sagemailer empowers sellers to optimize collaboration and enhance productivity within their teams.

Hi
How can I remove extra child access of Amazon Seller Central from my email?
Is this really updated for 2024? When we try to add Secondary Users to our Amazon UK account, we are required to upload a government-issued ID, and submit a date of birth, country of citizenship, country of birth, etc. Is that a UK-only requirement?